Sunday, July 21, 2013

Sunday, October 14, 2012
Heekscnc method of getting data to the python script
In my last post, I talked about how Heekscnc uses a master python script to coordinate the generation of g-code. In this post, I will try to convey how data is translated from the gui to this python script.
1. Look at the layout of HeeksCAD with the HeeksCNC installed :
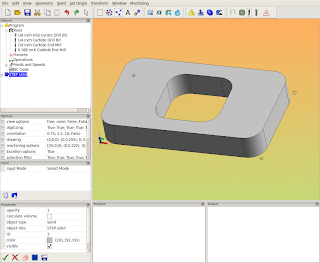 Notice that there is an Objects tree on the left side. This is how all the data for the cnc program is graphically represented. Double clicking in items in this tree usually causes the parameters of that particular item to be displayed and editable.
To create a toolpath in Heeks, you need a 'sketch' (geometry), a 'tool' (end mill, drill, etc...) , and an 'operation' (profile, pocket, drilling...). So the first thing needed to get this ball rolling is the 'sketch'. Here I select the face of a solid and right click on it. A dialog pops up and allows me to create sketches from the face.

The representation of the 'sketch' (or two sketches in this one) appears in the 'Objects tree':
 Notice that in my Objects tree there are already some tools listed. I have a tool table file stored on my hard drive with these tools in it.
I next select a sketch and one of the tools from the tree and then create an operation:
 I selected a 'Profile' operation because I want to cut around the outside profile of this part.
I also did the same thing with the inner sketch, but this time used a smaller tool and then selected the 'Pocket' operation. In Heekscnc, the pocket operation dialog looks like this:
 When I have a few operations set up, I usually get curious and want to see some results, so I usually post process what I have do far to see what the resulting tool paths look like:
 Pressing the 'Post-Process' button causes the master python script to be built and placed in the 'Program' panel:
 This is the same type of script that I blogged about last time. This script is run and creates a gcode file in the 'Output' panel.
 So, there you have it- that is a basic rundown of how Heekscnc operates.
The thing that I want to stress in this post is that anything that is represented in the Objects tree will be translated to the master python script and later converted into gcode.
1. Look at the layout of HeeksCAD with the HeeksCNC installed :
 Notice that there is an Objects tree on the left side. This is how all the data for the cnc program is graphically represented. Double clicking in items in this tree usually causes the parameters of that particular item to be displayed and editable.
To create a toolpath in Heeks, you need a 'sketch' (geometry), a 'tool' (end mill, drill, etc...) , and an 'operation' (profile, pocket, drilling...). So the first thing needed to get this ball rolling is the 'sketch'. Here I select the face of a solid and right click on it. A dialog pops up and allows me to create sketches from the face.

The representation of the 'sketch' (or two sketches in this one) appears in the 'Objects tree':

I next select a sketch and one of the tools from the tree and then create an operation:

I also did the same thing with the inner sketch, but this time used a smaller tool and then selected the 'Pocket' operation. In Heekscnc, the pocket operation dialog looks like this:


The thing that I want to stress in this post is that anything that is represented in the Objects tree will be translated to the master python script and later converted into gcode.
Friday, October 5, 2012
Python toolpath generation -HeeksCNC method
In this post, I want to explain the basics of how HeeksCNC uses python to generate toolpaths. The method that Dan Heeks came up with for doing this was brilliant. I have used bits and pieces of this method with different applications a lot and am just starting to use it with FreeCAD.
Here is a python script (Dan Heeks named it post.py in HeeksCNC) that is the main script for a gcode file.
post.py :
.png)
post.py reaches out to other scripts/modules in the heekscnc world for processing and formatting. These other scripts need to be in the python path, as you would expect.
libarea can be had from many places now, although I prefer to use the 'New BSD' licensed version that can be found here.
kurve_funcs.py is used for processing toolpaths for milling profiles. It depends on libarea too. I think we could probably untangle the dual dependency of calling 'import area' in post.py and in kurve_funcs.py, if we looked into it.
the line 'import nc.emc2' calls upon a user editable script that formats gcode for the emc2 (linuxcnc now) milling machine. There are a lot of other scripts in the nc directory that let one format the gcode for other machines.
Here is a summary of the components of this system again:

post.py :
import area
area.set_units(25.4)
import kurve_funcs
from nc.nc import *
import nc.emc2

output('/tmp/test.tap')
program_begin(123, 'Test program')
absolute()
imperial()
set_plane(0)

comment('Feeds and Speeds set for machining Please select a material to machine')

tool_defn( id=3, name='1/4 inch Carbide End Mill', radius=0.125, length=1.25, gradient=-0.1)
#(0.188 inch Carbide End Mill)

workplane(1)
comment('tool change to 1/4 inch Carbide End Mill')
tool_change( id=3)
spindle(7000)
feedrate_hv(33.07086614, 7)
flush_nc()
clearance = float(0.1968503937)
rapid_safety_space = float(0.07874015748)
start_depth = float(0)
step_down = float(0.035)
final_depth = float(-0.07)
tool_diameter = float(0.25)
cutting_edge_angle = float(0)
#absolute() mode
roll_radius = float(0.125)
offset_extra = 0
comment('Sketch')
curve = area.Curve()
curve.append(area.Point(1.25, -0.7))
curve.append(area.Point(-0.65, -0.7))
curve.append(area.Vertex(-1, area.Point(-1.4, 0.05), area.Point(-0.65, 0.05)))
curve.append(area.Point(-1.4, 0.45))
curve.append(area.Vertex(-1, area.Point(-0.65, 1.2), area.Point(-0.65, 0.45)))
curve.append(area.Point(1.25, 1.2))
curve.append(area.Vertex(-1, area.Point(2, 0.45), area.Point(1.25, 0.45)))
curve.append(area.Point(2, 0.05))
curve.append(area.Vertex(-1, area.Point(1.25, -0.7), area.Point(1.25, 0.05)))

roll_on = 'auto'
roll_off = 'auto'
extend_at_start= 0
extend_at_end= 0
lead_in_line_len= 0.25
lead_out_line_len= 0
kurve_funcs.profile(curve, 'left', tool_diameter/2, offset_extra, roll_radius, roll_on, roll_off, rapid_safety_space, clearance, start_depth, step_down, final_depth,extend_at_start,extend_at_end,lead_in_line_len,lead_out_line_len )
absolute()
program_end() .png)
post.py reaches out to other scripts/modules in the heekscnc world for processing and formatting. These other scripts need to be in the python path, as you would expect.
libarea can be had from many places now, although I prefer to use the 'New BSD' licensed version that can be found here.
kurve_funcs.py is used for processing toolpaths for milling profiles. It depends on libarea too. I think we could probably untangle the dual dependency of calling 'import area' in post.py and in kurve_funcs.py, if we looked into it.
the line 'import nc.emc2' calls upon a user editable script that formats gcode for the emc2 (linuxcnc now) milling machine. There are a lot of other scripts in the nc directory that let one format the gcode for other machines.
Here is a summary of the components of this system again:

Sunday, September 30, 2012
Our book on FreeCAD has been published

Friday, June 8, 2012
Experimental Online APT360 Processor
Edit-I have disabled the server for this, since I needed it for something else. This doesn't work anymore.
I have been playing with websockets and a Linode server. A friend of mine, Brent Muller, set up APT360 on the linode server and I created a python-tornado websocket interface to it.
Paste Apt code in the top text box and press the Post Code button. If there are no errors (be careful to make sure the first line of code begins on column one and that there is a line after 'fini') you should get gcode in the bottom pane. For those of you who know what APT360 is, have fun.
Available Post Processors: a1100m, cent1, cent2, dmb, dmb2, e4axvt, e5axtr, e5axvt, emc, webgl2
Sunday, May 13, 2012
Javascript post processing
This is a test to see how javascript could work for post processing. In the left textarea, add terms like 'g0(0,0,0)' for rapid moves, 'g1(1,0,0)' for feed moves and then press the 'Post' button to get some GCode in the right textarea box. Some of you might wonder why? This is just a test for something bigger.
GCode Post Processor
g0(x,y,z) - rapid
g1(x,y,z) - feed move
g2(x,y,i,j) - clockwise arc - i,js in absolute coordinates
g3(x,y,i,j) - counter clockwise arc
feedrate = 33.0 - feedrate
JavaScript Post Processor
Saturday, May 12, 2012
Javascript blogger test
This free script provided by
JavaScript
Kit
Subscribe to:
Posts (Atom)